Bobwhite and Fox Squirrel Flymph (SBS/Tutorial)
Posted: Sat Mar 05, 2016 4:47 pm
Bobwhite and Fox Squirrel Flymph
Hook - Mustad Model 3906B/Size 14
Thread - Pearsall's Gossamer Silk (Primrose) - well waxed before tying the fly
Hackle - Bobwhite Quail Wing Feather
Dubbing Brush - Fox Squirrel on waxed Primrose Silk
Tag/Rib/Head - Tying Silk
Preparation Notes:
In this case, I am using feathers from the top side of the bobwhite wing. I chose the small mottled brown feathers near the base of the wing, close to the body of the bird. I have pulled off most of the small feathers (the area near the bottom of the photo).
Before I begin tying, I pull off a dozen or so hackle feathers and prepare them by stripping off the basal fluff. If you plan to tye the feathers in by the tip, you can prepare the hackle by stroking the fibers out to reveal the tip. You can easily use a range of different size hackle feathers, simply by stripping down the hackle fibers unil you have fibers the length you want for you pattern. In this case, I wanted the hackle fibers to be roughly the full length of the hook.
TYING INSTRUCTIONS:
1) Mount the hook in the vise
2) Wax the tying thread and attach it to the hook. Make five secure wraps, just behind the eye of the hook.
3) Prepare a bobwhite feather by stripping off the base fluff, and then tye it in by the stem with five wraps. Leave the stem on for now, to provide build up under the thorax area. Wrap the tying thread back to the midpoint of the hook shank. Trim off the hackle steam and tag end of the tying thread. Now wrap forward towards the eye of the hook, in close touching turns. Stop when you tying thread gets to the base of the hackle stem. By wrapping the the middle and then forward again, you will have built up two layers of silk underbody in the front half of the fly. This will make the thorax area slightly larger in diameter, than the rear portion of the fly, which helps form a tapered body in the finished fly.
4) Take a prepared silk body and slid it up under the hanging thread. near the head of the fly. Leave the silk body hanging out over the front (eye) of the hook.
5) Wrap the tying silk back to the bend of the bend of the hook. Stop just behind the point of the hook.
Here is what it looks like at this point in the tying process. If you look closely at the underbody, you will notice a slight diameter difference between the front half and rear half of the body. This helps form the taper of the fly.
7) Wrap the dubbing brush back to the waiting tying silk.
8) Wrap the tying silk forward towards the eye of the hook. First make close touching turns, forming a silk tag, and in open spiral wraps to form the rib and segment the body of the fly.
9) Catch the tip of the hackle in a hackle pliers, stroke the fibers between your thumb and forefinger to fold the hackle fibers to one side. Then wrap the hackle back towards the body of the fly. Make two wraps of hackle, then bring the tying thread forward thru the hackle in a zig-zag motion. Clip of the hackle tip.
10) Whip finish the head, then brush out the body with a piece of velcro.
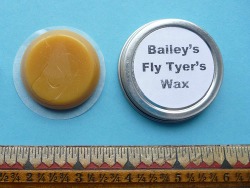
This fly was an excuse to play around with some new tying wax from our friend Bill Bailey (wsbailey). Bill has come up with a new formulation of his Fly Tying Wax and I had to try it out.
Bill, this new formula is terrific. Really easy to work with and just the right texture for treating the silk thread before tying. Just soft enough for the thread to easily cut into the wax, without being overly sticky or leaving gummy clumps of wax build up on the thread. Extremely nice to work with. Well done.
If anyone is interested in Bill's wax you can get some from Chris Stewart (http://www.tenkarabum.com/fly-tying-materials.html)

or from the FeathersMC website (https://feathersmc.com/)